Getting to know your inner turkey

Image

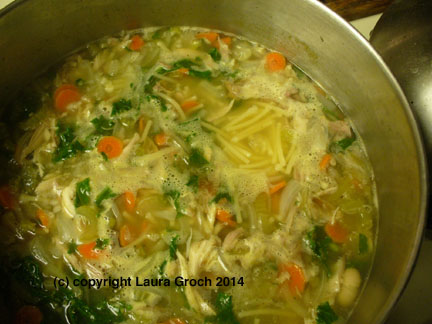
Turkey Soup is a thing of beauty once it’s finished, and you can vary the other ingredients to your liking. Photo by Laura Groch

One of my favorite post-holiday meals is turkey soup. Not only does it taste good, it’s a deserving second act for all the leftover turkey parts. And I do mean parts: the skin, the bones, the drippings, the neck and whatever giblets didn’t end up in the stuffing.

Even if this weren’t National Soup Month, I’d be telling you about making soup from turkey carcasses (sorry, there’s no pretty word to use). To my mind, this is not only thrifty, but respectful. I don’t like waste, and using every last bit seems to me a fitting way to be mindful of what that bird gave up for me.

I’m going to show you a basic recipe you can use all year round: how to boil all the leftover bits together, pull the meat off the bones and strain the broth, which will then become the base for a delicious, warming soup.

What’s nice about making your own soup — besides being able to control what goes into it — is that it’s so adaptable to whatever else is in the fridge. First, you don’t have to make this with turkey. Collect a gallon freezer bag of chicken bones, skin, necks and giblets, and use them. (Tip-Top Meats in Carlsbad sells frozen bags of chicken bones with lots of meat on them for soup-making.)

Second, you can switch around the other ingredients to your liking. Soup is forgiving and flexible. Some good additions:

— A quarter-cup of leftover tomato sauce or a chopped tomato.

— Leftover white beans, zucchini, chopped mushrooms or green beans.

— A couple of spoonfuls of mashed potatoes or cooked squash.

— Leftover gravy.

— Spinach, chard, chopped green cabbage, or frozen sliced okra instead of kale.

— Chopped parsley or cilantro to garnish.

— Cooked rice or barley or kasha instead of pasta.

Third, if you’re cooking for one or two, making a pot of stock or soup gives you lots of options. You can portion out the defatted broth and cooked meat into freezer containers to combine later on with some of the abovementioned veggies and leftovers, or put it all together and then freeze your finished soup in one- or two-serving containers.

To that end, as you prepare your next bird for cooking, save the giblets and neck (if you don’t have another use for them) in a plastic bag and freeze them. Some people cut off the wing tips and discard them, but they’re great to add to the soup pot, so freeze them, too.

After the feast, collect the bones, drippings and any skin scraps. Add them to the giblets, neck, etc., and freeze till you’re ready to make soup. If you have a lot, portion them into several bags — about a half-pound to a pound (about a half-turkey’s worth of bones) to each bag should be ample. Then freeze what you won’t be using right away.

I usually make my broth in a slow cooker, but you can also simmer it in a large pot on the stove. (This is Part 1 of the recipe.)

After encountering bone fragments once too often, I’ve finally learned to strain my broth. I use a wire mesh strainer, not a colander, and strain the broth into a large stockpot. The strainer may hold some pieces you want to keep, such as large pieces of meat, so pick them out and add them to the strained broth. If you’ve used celery, onion, etc., they’ll look pretty limp and unappetizing at this point. Some recipes tell you to discard them with whatever else remains in the strainer. Others tell you to puree them and add back to the soup. Your call. (I go back and forth on this, depending on my mood.)

I usually refrigerate the broth and the bowl of meat to work on the next day. By then, any fat will have congealed on top of the broth, and I can easily scoop it off and dispose of it. (NOT down the garbage disposal. Put it into your regular garbage or freeze it in a disposable container and then throw it out on garbage collection day.)

Next, pick off the meat from the boiled bones and scraps. Here’s where you will really get to know turkey anatomy. It’s a personal challenge to remove every last bit of meat from the bones (and you’d be surprised how much usable meat a turkey neck can yield). The best way to do that, IMHO, is with fingers, not a knife and fork. I usually collect a good cup and a half of meat.

You can stop at this point and freeze everything for a later cooking session. Pack the meat into a freezer bag or a freezer container, and do the same with the defatted broth. (Be sure to label everything!)

Otherwise, keep going with Part 2 of the recipe. Some notes:

— Adjust the seasoning as the soup veggies cook. They throw off some sodium, so it’s best to keep tasting.

— My favorite green in turkey soup is chopped kale. Since the leaves cook quickly, I add it at the end, with the pasta (see below). The stems are sturdier, so I remove them and dice them into about 1/4-inch pieces, then add them with the carrots, onions, etc. (My dog loves inch-long pieces of kale stems as a treat.)

— Pasta is my go-to starch. A small pasta — something that will fit in a spoon — works best. Try little stars, ditalini, orzo, alphabets, small elbows or shells. You can also use short lengths of broken-up spaghetti, or regular noodles. A cup will probably work, but I usually use at least 1 1/2 cups (no doubt compensating for being noodle-deprived as a child).

I hope you enjoy this soup as much as we do, and have fun adapting it to your own taste!

LAURA’S TURKEY SOUP, PART 1

1 turkey carcass, broken into pieces: This includes leftover wing, leg and thigh bones, skin (also neck and giblets if you have them), and skimmed pan juices

8-10 cups water or enough to mostly cover turkey carcass

1 medium onion, chopped

1 rib celery, chopped

1 carrot, chopped

1 clove garlic, chopped

1-2 bay leaves

Combine all ingredients in large slow cooker or large pot on stove. If using slow cooker, cook on Low for 4-6 hours. If using large pot, bring ingredients to a boil, then lower to a simmer, covered, with the lid slightly open. Cook 2-3 hours.

Remove from heat. Using tongs, remove as much of the bones, skin, and meat as possible and put in separate bowl. Refrigerate until cool; then separate meat from bones and shred into small pieces. Discard bones and gristle. Cover and refrigerate meat until ready to use in soup.

Using wire mesh strainer or colander lined with cheesecloth, strain broth into separate large pot or bowl. Pick out pieces of meat from strained ingredients and add to other turkey meat; be careful to remove all bones. If you wish, you can puree the vegetables and add back to the soup; otherwise, discard vegetables and bay leaves. Refrigerate broth until fat has risen to top, then skim fat from surface and discard.

Defatted broth and meat can be frozen for later use. Otherwise, proceed with Part 2.

LAURA’S TURKEY SOUP, PART 2

1 medium onion, chopped

1-2 ribs celery, chopped

1-2 carrots, sliced

1-2 cloves garlic, minced

1 tablespoon olive oil

8 cups turkey broth from Part 1 of recipe

2 teaspoons chicken bouillon

1/4 teaspoon each sage and thyme, rubbed between palms to pulverize leaves

1-2 kale leaves, shredded or torn, with stems removed and finely chopped

1 to 1 1/2 cups noodles or small pasta

In large skillet, saute onion, celery, carrots and garlic in olive oil until soft. Scrape contents of skillet into soup pot with broth from Part 1 of recipe. Add chicken bouillon, sage and thyme, and chopped kale stems. Bring to a boil, then simmer, partly covered, until vegetables are tender, about 30 minutes. Stir in shredded kale leaves and pasta; cook for another 10 minutes, stirring occasionally, until pasta is done. Stir in turkey meat and bring back to a boil. Turn off heat and adjust seasonings. Makes about 10 cups soup.

(c) copyright Laura Groch 2014

Gluten-free at breakfast? Cookbook author can tell you how

Image

Above: Apple Pancakes from “Gluten-Free Breakfast, Brunch & Beyond” by Linda J. Amendt (recipe below). All photos (c) 2013 by Tara Donne. 

Note to readers: Leave your comment below, and I’ll choose one at random to win a copy of “Gluten-Free Breakfast, Brunch & Beyond” by Linda J. Amendt.

Linda J. Amendt has made a name for herself in Southern California (as well as other states) as a canning and preserving expert and a food-contest judge. She has won more than 900 awards in state and county fair competitions, and has written three award-winning cookbooks.

(Full disclosure: I own a copy of her “175 Best Jams, Jellies, Marmalades & Other Soft Spreads” and love it.)

Gluten-free cooking isn’t exactly her field of expertise. But when she was asked by her publisher to create a gluten-free cookbook, she was ready for the challenge.

Though she doesn’t have to avoid gluten herself, Amendt is very, very familiar with the world of food allergies and sensitivities. For years, she has coped with an allergy to the alkaloids in plants in the nightshade family — tomatoes, potatoes, peppers of all kinds, eggplant, okra, and several kinds of berries, to name a few.

“I understand what people go through because gluten is used as a thickener (in many foods), and you have to read labels,” she said in a recent phone interview.

People with celiac disease — a genetically linked autoimmune disorder — must avoid foods made with wheat or wheat products, which contain gluten.  Rye, barley and sometimes oat flours — but not corn or rice — also contain gluten-like proteins. These proteins trigger an immune reaction in the small intestine. It interferes with the body’s ability to absorb nutrients, which creates digestive and other problems over time. Ridding the diet of gluten can help restore the gut’s normal digestive and absorption function.

ImageAmendt, a Murrieta, CA, resident,  had already been helping some friends remove gluten from their diets by reformulating recipes for them. So when her publisher proposed the gluten-free breakfast book, “I thought, ‘What a cool idea!'”

“Gluten-Free Breakfast, Brunch & Beyond” (Taunton Press, trade paperback, $19.95) was born about 10 months later. In it, Amendt covers 100 recipes for quick breads, muffins, scones, pancakes, waffles, French toast, crepes, quiches, omelets and more in 234 pages with color photos.

Making gluten-free versions of those foods is doubly difficult: Gluten is what gives baked goods structure and height, as well as flavor. Not only must revised recipes taste good, it’s important for them to look as appetizing as their non-GF versions.

As she talked to people on GF diets, Amendt realized, “One of the things they really missed was having baked goods similar to what all-purpose (wheat) flour produces. Without gluten, there’s no structure, no support” for breads or cakes or muffins. “My purpose was to try and replicate the texture and flavor of foods made with all-purpose wheat flours. That’s what people missed the most.”

Home cooks cope with the GF regimen by using many different grain flours in varying combinations. “There are a lot of gluten-free recipes that require 10 different flours,” Amendt said.

She met this challenge by creating two all-purpose flour blends — one that takes the place of all-purpose wheat flour in recipes, and one that’s more like a whole-grain blend. They are made with white-rice flour, brown-rice flour, tapioca flour and potato starch, and are the basis for all the recipes in the book that use flour.

“I used rice flour because it’s very neutral, as opposed to soy or sorghum flours, which have a very strong taste and can be heavier,” Amendt said. “Rice flour is lighter, because there’s no gluten you have to replace.”

A natural substance called xanthan gum is also a major player in her recipes. “I learned about the gum from friends, then it was a question of figuring out the right ratios in what kind of recipe. That started me in coming up with a general flour to substitute in all the recipes.”

Perfecting the flour blends took about a month, she said. “I just kept working on those until I got consistent results. Then it was a matter of taking some of my favorite recipes and converting them to gluten-free.”

Among those recipes are traditional favorites like Zucchini Bread, Buttermilk Biscuits, Blueberry Pancakes, Spice Muffins, and Cinnamon Crumb Cake, and variations like Pumpkin Sweet Rolls, Raspberry Coconut Coffee Cake, Spinach Waffles, Cherry Almond Scones and Cheddar Cheese Biscuits.

Besides the recipes, Amendt offers easy-to-read tips for each category and instruction on using starches and flours, baking and mixing techniques, and sources for gluten-free ingredients. She also explains why baking with gluten-free flours is different from using wheat flour.

“Gluten-free batters need to be thick to support the structure of the baked good,” she said. “If you’re finding your batters are too thick, add more fat to them. That will thin them out. Or you can increase the leavening by 25 to 50 percent. That will really help it rise more.”

Quiche crusts benefit from added baking powder. “I use it with my regular pie crusts,” she said. “It just helped them to puff better. This is a problem with a lot of gluten-free foods — they tend to be dense and heavy.”

Another tip: Try a narrower baking pan.

“Gluten-free batters, when rising, need something to cling to,” Amendt said. “Without that gluten around to support them, they are likely to sag in the center. Or they’ll rise, then fall.” For breads, that means trying an 8-inch-by-4-inch pan instead of the usual 9-by-5.

“If you’re making a quick bread and it’s not working in a pan, try baking it as muffins.”

Among her favorites in the book are the Apple Pancakes, Carrot Muffins, Poppyseed Coffee Cake and the Spinach And Feta Quiche. “The one that was the really big hit was the Banana Maple Muffin,” she said. “I gave those to a bunch of different people. Nobody knew (they were made with gluten-free flour) until I told them. Everyone really liked that recipe.”

Image

These recipes are from “Gluten-Free Breakfast, Brunch & Beyond”:

GLUTEN-FREE ALL-PURPOSE FLOUR BLEND

4 cups finely ground or stone-ground white-rice flour

2 cups stone-ground brown-rice flour

2 cups tapioca flour or tapioca starch

1 cup potato starch (not potato flour)

In an extra-large bowl or container, combine the rice flours, tapioca flour, and potato starch. Whisk together until the ingredients are thoroughly blended. Use a large spoon to bring the flour from the bottom of the bowl up to the top and whisk again. Repeat a few times to make sure the flours are evenly distributed throughout the entire mixture.

Store the flour in an airtight container or ziptop storage bag at room temperature for up to 1 month. For longer storage, keep the flour in the refrigerator or freezer. Allow the flour to come to room temperature before using.

Lightly stir the flour before measuring. Spoon the flour into the measuring cup and level off the top with a straight-edged utensil, such as the back of a knife. Makes about 9 cups.

===

I like to use Grade B maple syrup for baking. It has a stronger maple flavor and darker color than Grade A Amber maple syrup, the type commonly used as a topping for pancakes and waffles. Grade B maple syrup can be found in specialty food markets and some health food stores.

BANANA MAPLE MUFFINS

Unsalted butter or nonstick baking spray, for the pan

1 3/4 cups Gluten-Free All-Purpose Flour Blend

2 teaspoons baking powder

3/4 teaspoon xanthan gum

1/2 teaspoon table salt

1/4 teaspoon baking soda

1/2 cup (1 stick) unsalted butter, softened

2/3 cup granulated sugar

1/3 cup firmly packed brown sugar

2 tablespoons maple syrup, preferably Grade B

2 large eggs

1 1/2 cups mashed ripe bananas (2 to 3 bananas)

Heat oven to 375 degrees. Grease a 12-cup muffin pan with unsalted butter or nonstick cooking spray.

In a medium bowl, whisk together the flour, baking powder, xanthan gum, salt and baking soda until well combined. Set aside.

In a large bowl, using an electric mixer on medium speed, cream the butter, granulated sugar and brown sugar until light and fluffy, about 2 minutes. Scrape down the sides of the bowl. Beat in the maple syrup. Add the eggs, one at a time, beating well after each addition. Scrape down the sides of the bowl. Gradually stir in the flour mixture. Mix until smooth, about 30 seconds. By hand, stir in the bananas.

Spoon the batter into the prepared muffin pan, filling each cup until nearly full and mounding the batter in the center to the top of the cups, or slightly above.

Bake until golden brown and a wooden pick inserted in the center comes out clean, 18 to 20 minutes. Immediately remove the muffins from the pan, transfer to a wire rack, and cool the muffins on their sides. Serve muffins warm or at room temperature. Makes 12 muffins.

===

I like to use smooth applesauce in this recipe because it gives the pancakes a velvety texture. Any good cooking apple, such as Gala, Fuji, Jonagold, Golden Delicious or Granny Smith, will work well. Be sure the peel the apple before grating, as the peel can be tough when cooked.

APPLE PANCAKES

1 1/2 cups Gluten-Free All-Purpose Flour

3 tablespoons firmly packed brown sugar

2 teaspoons baking powder

1 teaspoon ground cinnamon

1/2 teaspoon table salt

1/2 teaspoon xanthan gum

1/4 teaspoon grated nutmeg

2 large eggs

2 tablespoons unsalted butter, melted, or vegetable oil

1/2 cup unsweetened applesauce

1 cup whole milk

3/4 cup grated or finely chopped peeled apple

Nonstick cooking spray or unsalted butter, for the pan

Maple syrup for serving (optional)

Heat a griddle or large nonstick frying pan over medium heat, or heat an electric griddle to 350 degrees.

In a medium bowl, using a wire whisk, combine the flour, brown sugar, baking powder, cinnamon, salt, xanthan gum and nutmeg until well blended. Make a well in the center and set aside.

In a medium bowl, using a wire whisk, lightly beat the eggs. Gradually whisk in the melted butter until evenly combined, then stir in the applesauce. Whisk in the milk until well blended. Pour the liquid mixture into the well in the flour mixture all at once. Stir just until combined and the flour mixture is moistened. There may be a few small lumps; do not overmix. Gently stir in the apples just until evenly distributed.

Lightly grease the griddle with nonstick cooking spray or unsalted butter. Ladle or spoon about 1/3 cup of batter per pancake onto the griddle. Cook until the pancakes rise, bubbles start to come to the surface, and the underside is golden brown, 3 to 4 minutes. Turn over and cook until golden brown, 1 1/2 to 2 minutes more, adjusting the heat if needed to prevent overbrowning. Serve hot with maple syrup, if desired.

Note: Individual serving-size containers of applesauce hold 1/2 cup and are the perfect premeasured amount to use in this recipe.

(c) copyright Laura Groch 2013

Salvaging a Dessert Disaster

Image

Above: The (successfully) remade cookie bars. See how I managed to salvage my disaster of a dessert. 

This is a story of kitchen hubris (mine) and dessert redemption (also mine). Maybe you’ve been there too. This is my cautionary tale:

I found two cans of sweetened condensed milk deep in my pantry recently. I had bought them a while ago “in case I needed them,” but obviously never had. I decided to use them up rather than throw them away. They were old. They didn’t even have expiration dates. But the cans weren’t bulging or anything, so I thought they were probably still good.

(Beep. Beep. Hazard ahead!)

The only recipe I know that uses SCM is Magic Cookie Bars. It’s easy: chocolate chips, nuts, coconut, raisins, pretzel pieces, butterscotch chips, whatever, on a graham-cracker-and-butter base in a 9-by-11 pan, bound by the sweetened condensed milk poured over it and then baked and cut into bars.

As a bachelor, my husband used to make Magic Cookie Bars whenever he needed to contribute to an office potluck. I thought I’d surprise him by putting one of those old cans to good use and making a batch.

So I set up the graham-cracker base, scattered a cup each of chocolate chips, chopped peanuts, coconut and raisins, then opened one of the cans of SCM.

(Alarm bells. Warning!)

Oh my.

It was the color of crankcase oil and the consistency of petroleum jelly. It didn’t smell sweetened; it had a faint cheese odor instead.

But I’d never baked with SCM before, so maybe it always looked like this, I told myself.

(Klaxon horns. Danger!)

I spooned it onto the cookie bars and put the pan into the oven. Maybe the heat of the oven would transform it into something more appetizing.

A half-hour later, out of the oven it came. Or should I say, “Out of the oven — ‘IT’ came.”

Image

The pan looked exactly the same. This was not good. (see photo above)

My husband came into the kitchen to see his cookie bars. They were a surprise, all right. Gallantly, he said, “I’m sure they will be OK.”

After dinner, we dug in. They weren’t.

Glumly, we chewed through our portions. Everything else in the bars tasted OK. The sweetened condensed milk was obviously past its prime, but not really BAD. Just not really GOOD.

I put the pan in the fridge, chagrined and humbled by my bad decision.

Throwing the bars out would be a shame, though I was leaning that way. (I had already tossed the other can of SCM.)

If only I could save them. But how?

In bed that night, thinking about my defeat, it dawned on me that most of the ingredients were solid: nuts, coconut, raisins. Even the chocolate chips came out of the oven unchanged.

More to the point, they were all pretty waterproof.

What if I could wash them? Dissolve that Bad Sweetened Condensed Milk off them? I’d lose the graham-cracker base, but that was OK. The whole pan would be a loss otherwise.

The next morning, I filled a large bowl with water and sat it in the sink. I broke off parts of the Bad Cookie Bars and dunked them into the bowl. Then I squooshed them and mooshed them around in the water, breaking them up with my fingers, until everything was dissolved off.

I drained and rinsed what was left, and spread it in a pan to dry. I had raisins. Coconut. Peanuts. And chocolate chips — intact, though they had softened a bit. More important, they hadn’t dissolved.

(Trumpet fanfare. Rescue at hand!)

I let the ingredients dry for a few hours before heading to the store for fresh SCM and more graham crackers. (And FYI, fresh sweetened condensed milk looks like vanilla pudding.)

Then I remade those bars using the laundered ingredients, plus another cup of coconut. They baked up pretty the second time around and tasted just fine. Whew.

(Angelic choir. Victory!)

(c) copyright Laura Groch 2013

Pick a peck of peppers, and roast ’em

Image

When peppers go on sale, buy a bunch and roast them yourself. (Photos by Laura Groch)

Roasted red peppers are a colorful, versatile addition to your kitchen palette. You can buy them for upwards of $6 a jar — or I can show you how to roast your own for a fraction of the cost. And with peppers at such bargain prices this week (they’re going at 3 and 4 for $1), it’s time for a lesson in this easy way to add a gourmet touch to summer salads, sandwiches, pizzas and more.

You don’t need to build a fire to roast a pepper. I often roast mine in my little toaster oven. You can also use your oven or even a barbecue grill (just make sure the fire isn’t TOO hot, as they can burn beyond salvaging in just a few moments).

Roasting (really, broiling) peppers softens them and adds a bit of sweetness. I like to roast red bell peppers, but any color pepper will work. Use what you like (that includes jalapenos, Anaheims, etc.) and whatever’s at the best market price.

Here’s how:

Wash peppers; slice them in half lengthwise. Clean out the seeds and remove the stems. Rub or spray with a little bit of olive oil if you wish. Lay them flat on a foil-covered roasting pan, skin side up — or if you’re using a grill, do them skin side down. The idea is to get the skin side close to the heat source.

Image

Broil or grill the peppers until the skins are blackened but not burned. (See photo: They should look a little bit scary.) Try to position the peppers so they blacken evenly; it’s not necessary to blacken the whole surface.

When the peppers are ready, use tongs to remove them from the oven or grill and transfer them into a plastic bag. (I usually save a couple of empty cereal bags — the kind that line cardboard boxes of cereal — for this purpose. They’re very sturdy and leak-proof.) Add any juices that may have collected in the pan. Then close the bag tightly with a clip or twist-tie. Leave some air space — you don’t have to roll the bag shut all the way down to where the peppers are.

Let the peppers rest in the bag for about 20 minutes. They’ll continue to steam for a bit, and then they’ll cool off enough for you to handle them.

Now you’re ready to peel them. Remove the pepper halves one by one from the bag. The blackened skin will have blistered and raised from the flesh a bit. Put the pepper on a cutting board and grab a piece of skin. It should peel away easily from most of the pepper’s surface. You may not be able to remove all the skin — that’s OK.

Slice the peeled pepper into strips (my preference) or leave them in bigger pieces. Put the peeled peppers into a bowl, and pour over any juices that may have collected in the bag or on your cutting board. You can now add some olive oil to them, a dash of your favorite vinegar if you like, or maybe some shaved garlic. Stir and refrigerate.

Image

What can you do with roasted peppers? Try them as part of an antipasto plate with olives, mozzarella, salami and artichokes. Use them to liven up salads. They’re also wonderful in an omelet or frittata or quiche, and on homemade pizza (or add them to storebought pizza). Stir them into a pasta dish with chopped tomatoes and/or sauteed zucchini.

They’re also great in sandwiches. One of my favorites is a simple vegetarian sandwich: Split open a crusty roll or other sturdy bread, spread with a little hot chili sauce, and then top with hummus, sliced red onion, tomato, cucumber and roasted peppers. Yum! It’s light and easy on a hot day when you don’t feel like cooking.

I’m sure you’ll come up with more ideas. Roasted peppers will keep for about a week in the fridge. I don’t recommend freezing them, as the texture will break down too much. So enjoy them — and the money you just saved by making them yourself!

(c) copyright Laura Groch 2013

Frozen assets and how to create them

Image

Above: My blanched brussels sprouts, ready for patting dry and freezing.

I admit I’m one of those people who regularly prowl supermarket “clearance” racks. When I find something I can use that’s been marked down, it’s like hitting triple 7s at the slots.

At the market last weekend, I spotted two packages of brussels sprouts, each 24 ounces, both marked to half price, $1.99. (If you don’t happen to be a fan of brussels sprouts, please keep reading, as this will work with other vegetables.) Three pounds for $4, not bad. Into the cart they went.

I didn’t want to cook them all at once and live off brussels sprouts all week, so I decided to freeze them for future use. To do this, I would need to blanch them first.

Blanching means cooking the vegetables briefly, then stopping the cooking. Why not just toss the bags of sprouts into the freezer? According to my Better Homes and Gardens cookbook, the precooking stops the action of an enzyme that would otherwise make the vegetables deteriorate. With blanching, they’ll hold better in the freezer.

Once I got them home, the sprouts went into the sink for an inspection and a wash while a big pot of water came to the boil on the stove. I trimmed off the ends and put a vertical cut (some people do an “X”) into the sprout bottom, about a quarter-inch deep, for more even cooking when they come out of the freezer. Another pot of cold water was waiting in the sink.

Once the water boiled, I put in a couple of handfuls of sprouts, let them boil for a couple of minutes, then scooped them out and plunged them into the cold water. (For best results, use ice water, and refresh it as the ice melts.) Then I drained them, spread them on a paper towel and blotted them dry a bit. Once all the sprouts were done and cooled off, I portioned them into freezer bags, sealed them and patted them flat, then stacked them in the freezer for future use.

It’s pretty easy, and I love when saving money is easy. ;<) Check your cookbooks or the Internet for blanching times recommended for different vegetables — they can vary from 3 to 5 minutes, depending on the veggie and the size of the pieces you’ve cut it into.

It’s also good to consult an expert source about which vegetables need this technique and which ones don’t. Some vegetables, like onions and peppers, don’t need blanching — just wash, blot dry, and freeze. The National Center for Home Food Preservation has lots of good information and a chart of various veggies and times.

(c) Copyright Laura Groch 2013

Coming clean: My spatula had a secret

spatula

After years in the kitchen, I finally learned how to clean the inside of my spatula. How embarrassing. (Photo copyright 2013 Laura Groch)

One of my favorite kitchen utensils is the simple spatula. The kind that scrapes bowls and pans  (not the kind that flips fried eggs). It’s great for getting those last little blobs out of bowls, bottles and blenders.

BUT — I’ll be honest with you — I could never get mine completely clean.

Little bits of I-don’t-know-what got under the handle and stayed there in a state of  unreachable and permanent grodiness. Yes, the blade part was spotless, but — that ick under the handle bugged me. Until I read online about the dirtiest places in the kitchen and how to clean them.

Spatula was right up there — as well as how to TAKE IT APART to clean it. Most spatulas are built the same, wrote the posters (www.recipe.com/blogs/cooking/nine-dirtiest-places-in-your-kitchen-youd-be-surprised) — you can basically just grasp the blade (as in photo above) and yank it apart (photo below).

Image

Well. All these years of cooking (and cleaning) and I had no idea you could take a spatula apart. I felt pretty dumb.

I marched to the kitchen and took mine out of the drawer. Yank! Pop! and there it was in two pieces.

Reader, I scrubbed it to a fare-thee-well, inside and out. As those of you who also didn’t know this little tidbit will no doubt be doing shortly! :<)

Do yourself a fava

Image

My British pal Daphne and I were chatting in our local produce market recently when she spotted a display of bright green fava bean pods. “Oh! I must get some of these. They’re wonderful. We call them broad beans, you know. You must get some; this is a terrific price.” (It was — only 49 cents a pound.) I had to agree, and scooped up several handfuls myself.

Fava beans are showing ever-so-fleetingly in the farmers markets these days. If your only encounter with the fava bean is the Hannibal Lecter quote from “Silence of the Lambs,” well, it’s time to reset the brain banks.

Buy yourself a bagful of the oversized bean pods — you’ll need more than you think, as each pod holds only a few beans. But the beans are large, so they add up. As you can see in the photo attached, the beans are well cushioned in the pods, which almost look like styrofoam stuffing on the inside.

As you also should be able to see, the beans are kind of a two-stage process: You have to get them out of the pods, then cook them briefly, then shell them again! They have a protective skin that must be removed before they are edible. (They’re kind of like artichokes in that you end up with way more green leavings than what you started with.)

So shell them, drop them briefly into boiling water (about 30 seconds, or until you can see bright green shading through the “second” skin), then drain and rinse in cold water. To remove the skins, which will now have some slack on them, my method is to pierce or tear it with a thumbnail, then push or squeeze the bean out (faster than trying to peel it). The two bright-green beans at the bottom of the photo are what you’ll end up with (the skins are above them).

Though they are a bit of trouble, favas are tasty — not mealy like legumes, but more like fresh peas, with a touch of bitterness. I like them best just added to a salad. If you can shell enough of them to make a side dish, they’d also be good simply cooked and buttered.  Try them in soup, mash them into hummus — just be sure to grab some as soon as you spot them!